Showing posts with label Green. Show all posts
Thursday, August 9, 2012
Australis Mates Rates
Wow it has been that long since my last post.. almost 5 months!
Time to dust off the cobwebs and revive Nailbytes!
What I have here today is Australis Mates Rates which I believe is only available in Australia. My friend was there for a month and I have asked for nail polish, specifically only made in Australia. Boy, he came back with a bundle! Not only did he manage to get those Australis polish which I painstakingly picked from online reviews, he also managed to get Face of Australia and Bloom! I will post the swatches soon, all in good time :-)
Australis Mates Rates is a deep forest green polish with gold shimmer. The gold overlay gives a dark olive shade. I might have mentioned before that I usually avoid green on my nails because it doesn't suit my skin tone, creating a washed out look. However I suppose it only applies to greens in pastel, jade and dusty shades.. with Mates Rates my nails look fab!
Application is smooth, drying time is fast too. But the brush is left to be desired; a bit hard, kinda rebellious by refusing to obey the directions. Not sure if this is an isolated case, will test out other Australis polish next time!
This green baby is opaque in two coats; you can have it in one and with one you can see a teal underlay:
Under direct sunlight, the gold shimmer is very evident on the nails:
In natural daylight it reflects the blackened green with gold peeking out in certain angles:
There are bubbles on the nails, hmm. I suppose in such weather with constant movements while they're still wet (i was walking to and fro in the house lol) give rise to these bumps. It's pretty on its own but to hide the hideous imperfections I resorted to stamping :-P
I used China Glaze Passion (metallic chrome gold) for the leopard prints. Turned out to be better than expected!
*excuse the dry cuticles! it's been awhile they took the center stage in macro shots!
All above are shown with 2 layers of base coat (to prevent staining). No topcoat.
Saturday, March 10, 2012
Nubar Reclaim
Hello everyone!
It'll be the last post before I fly off to Singapore today, the last post written in Malaysia :) I will be out of transmission in Singapore till I subscribe to their local broadband, I wonder how I'm gonna survive without internet! Sheesh. Once cable is up Nailbytes will continue on, please wait for me ya?
Before heading home, I have chosen the critically acclaimed Nubar polish, an all-time favourite: Reclaim. I bought it sometime ago and, just like Peacock Feathers and Royal Velvet, have since reluctant to swatch on them because they are oh-so-precious! Since I'm leaving and having seen the holo magic on CC Worth The Risque, I decided to leave Malaysia with a big holographic bang :)
Nubar has this funnel-shaped bottle that looks small which somehow vexed me because their polish is superb, colors are awesome and hey, why compromise quantity? But don't be fooled, it's of regular 15ml size. I just can't believe swatching it can cause significant amount of polish loss looking from the bottle!
Reclaim is part of Nubar Going Green collection and it's the only linear holographic polish among the rest. It's a young green, leaning towards the color jade and the holo turns the polish into goldish-yellow on your nails when in shade.
It only takes 2 coats to achieve opacity. Holographic polish that's pigmented, great isn't it! However I have application issues due to the brush, sometimes it doesn't agree with me and drag itself on the nails. But it isn't a big deal since it dried smooth, glossy and real fast.
Now, green is not my color. From experience my skin tone doesn't go well with greens, especially in lighter shades. But I do like Reclaim very much, the linear holo holds so much of my attention and awe that everything is forgiven!
All are taken without top coat. Below photos are shot indoor, natural light, daytime. Holo is visible though not too obvious. I have other polish that couldn't show their holo talent in the shade so Reclaim surpasses them all!
Here's the holographic bang when Reclaim is shown under direct sunlight!
You don't have to twist 'n turn your fingers to find them, holographic in Reclaim is e-v-e-r-y-w-h-e-r-e. Such a winner, totally glorified and deservedly so!
Are you a Reclaim fan too? Linear holo is still very much visible even with topcoat. Awesome yea? Definitely a keeper! :)
It'll be the last post before I fly off to Singapore today, the last post written in Malaysia :) I will be out of transmission in Singapore till I subscribe to their local broadband, I wonder how I'm gonna survive without internet! Sheesh. Once cable is up Nailbytes will continue on, please wait for me ya?
Before heading home, I have chosen the critically acclaimed Nubar polish, an all-time favourite: Reclaim. I bought it sometime ago and, just like Peacock Feathers and Royal Velvet, have since reluctant to swatch on them because they are oh-so-precious! Since I'm leaving and having seen the holo magic on CC Worth The Risque, I decided to leave Malaysia with a big holographic bang :)
Nubar has this funnel-shaped bottle that looks small which somehow vexed me because their polish is superb, colors are awesome and hey, why compromise quantity? But don't be fooled, it's of regular 15ml size. I just can't believe swatching it can cause significant amount of polish loss looking from the bottle!
Reclaim is part of Nubar Going Green collection and it's the only linear holographic polish among the rest. It's a young green, leaning towards the color jade and the holo turns the polish into goldish-yellow on your nails when in shade.
It only takes 2 coats to achieve opacity. Holographic polish that's pigmented, great isn't it! However I have application issues due to the brush, sometimes it doesn't agree with me and drag itself on the nails. But it isn't a big deal since it dried smooth, glossy and real fast.
Now, green is not my color. From experience my skin tone doesn't go well with greens, especially in lighter shades. But I do like Reclaim very much, the linear holo holds so much of my attention and awe that everything is forgiven!
All are taken without top coat. Below photos are shot indoor, natural light, daytime. Holo is visible though not too obvious. I have other polish that couldn't show their holo talent in the shade so Reclaim surpasses them all!
Here's the holographic bang when Reclaim is shown under direct sunlight!
You don't have to twist 'n turn your fingers to find them, holographic in Reclaim is e-v-e-r-y-w-h-e-r-e. Such a winner, totally glorified and deservedly so!
Are you a Reclaim fan too? Linear holo is still very much visible even with topcoat. Awesome yea? Definitely a keeper! :)
Sunday, February 12, 2012
Orly Space Cadet
Heya everyone! How was your weekend? For this post I'm showing couple of photos of Orly Space Cadet from Cosmic FX collection.
Bottle pics first -
So many colors flashes insanely even from the bottle -
This pigmentation is thin, you need to put either 2 thick coats or 3 thin layers for decent opacity. Application is excellent, brush is good and Orly rubber cap is simply awesome for grip and control. However I did my manicure in a humid condition and resulted in bumps...
Under artificial light, the color changed to plum-pink-purple. Under natural light, the green with gold undertone shone. Orly has created a new standard for duochromes: You don't have to contort & twist your fingers to find the duochromes. You can see the colors on the nails at any angle or even when fingers are at rest! The glass speckles add dimension and depth to the overall look. Fabulous.
I have another bottle from Cosmic FX collection: Galaxy Girl. Will swatch it soon!
Bottle pics first -
The polish from Orly Cosmic FX collection is unique: textured like minerals in glass-speckled manner and extremely well-duochromed.
Quote from Orly:
The MINERALFX technology includes specialty mica, that allows for a clearer, vibrantly bright lustrous shimmer. Crystals allow for a multi-dimensional color transformation. Glass particles carefully controlled in shape and size create a luminous phenomenon. This combination infused with the Silica and specific colors selected create this exclusive technology that gives nails a unique optical effect that’s magnified as the lighting source intensifies or viewing angle changes.
So many colors flashes insanely even from the bottle -
![]() |
| Pink, copper, gold, green... even purple/plum |
This pigmentation is thin, you need to put either 2 thick coats or 3 thin layers for decent opacity. Application is excellent, brush is good and Orly rubber cap is simply awesome for grip and control. However I did my manicure in a humid condition and resulted in bumps...
Under artificial light, the color changed to plum-pink-purple. Under natural light, the green with gold undertone shone. Orly has created a new standard for duochromes: You don't have to contort & twist your fingers to find the duochromes. You can see the colors on the nails at any angle or even when fingers are at rest! The glass speckles add dimension and depth to the overall look. Fabulous.
I have another bottle from Cosmic FX collection: Galaxy Girl. Will swatch it soon!
Thursday, February 2, 2012
Essence Choose Me!
Hey readers, how are you? :) My past week had been a rollercoaster ride and I'm still getting the tremors.
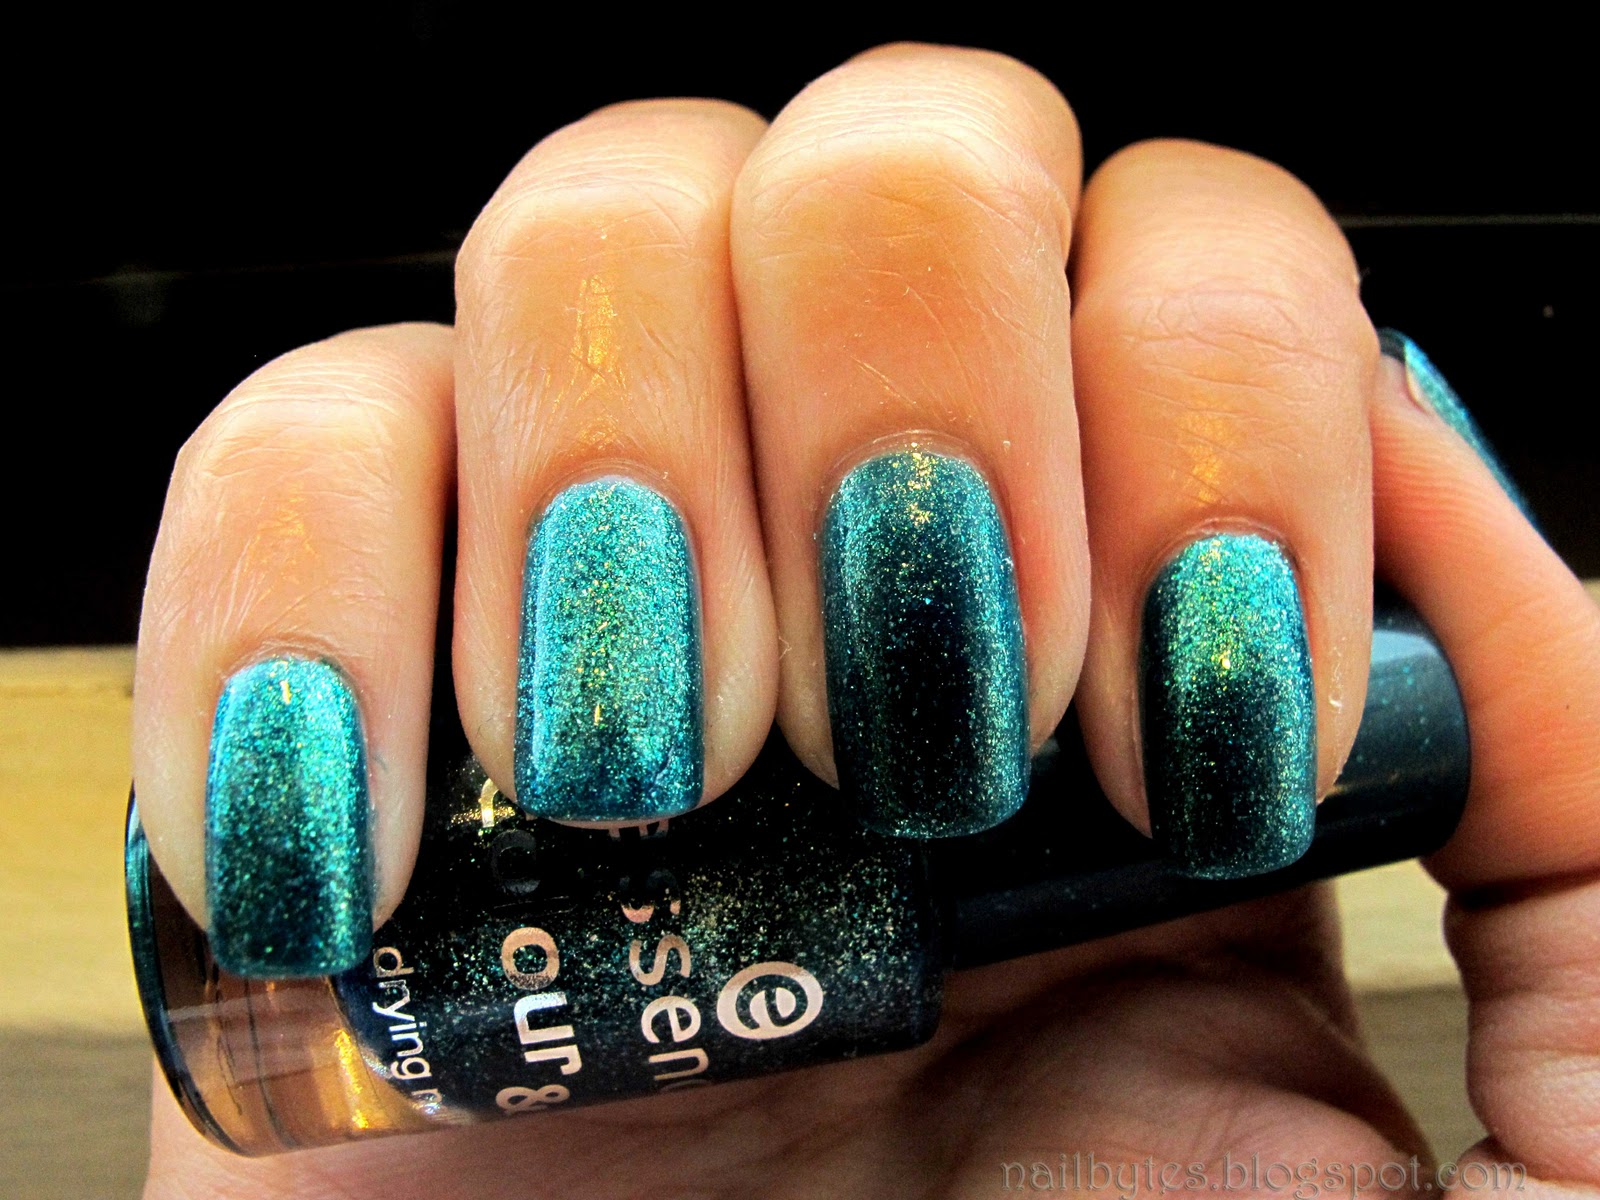
Despite the ups and downs, I took time to change my manicure.. Ha, you know colors do affect one's mood. I needed something bright and sparkling so I used this polish; apt for its name, right for my purpose too - Essence Choose Me!
Essence Choose Me! contains crazy zillions millions of green, gold micro glitters that if you stare at them long enough, either to pick up the glitter colors or simply in awe of it, your eyes will stay crossed for few seconds. What I'm trying to say is, the glitters are so small, really micro but superbly reflective. You just can't pick them out one by one :)
Look at them from the bottle -
Oh I forgot to mention, Choose Me! is teal base, a little on the jelly side yet appears foilish-metallic. Fast drying time (dried smooth too)! Application is great, brush is a-okay but sadly it isn't long-wearing. Mine chipped after a day.
It will reach opacity in just 2 coats but I kinda screwed up on my ring finger so I topped it up with a 3rd coat.
I was intrigued by the glitter so I placed my nails under the lamp to glorify the glitter -
What do you think? Mesmerizing? Dazzling? It's blinding isn't it?
I remember swatching a similar shade before... ahh yes, Sparitual Rhythm of Life. Yes, it's similar except RoL is a frosty metallic without glitters. Here's the pic -
Do you like it? I think my skin tone doesn't go well with teal and greens... hmmm.
Despite the ups and downs, I took time to change my manicure.. Ha, you know colors do affect one's mood. I needed something bright and sparkling so I used this polish; apt for its name, right for my purpose too - Essence Choose Me!
Essence Choose Me! contains crazy zillions millions of green, gold micro glitters that if you stare at them long enough, either to pick up the glitter colors or simply in awe of it, your eyes will stay crossed for few seconds. What I'm trying to say is, the glitters are so small, really micro but superbly reflective. You just can't pick them out one by one :)
Look at them from the bottle -
Oh I forgot to mention, Choose Me! is teal base, a little on the jelly side yet appears foilish-metallic. Fast drying time (dried smooth too)! Application is great, brush is a-okay but sadly it isn't long-wearing. Mine chipped after a day.
It will reach opacity in just 2 coats but I kinda screwed up on my ring finger so I topped it up with a 3rd coat.
I was intrigued by the glitter so I placed my nails under the lamp to glorify the glitter -
What do you think? Mesmerizing? Dazzling? It's blinding isn't it?
I remember swatching a similar shade before... ahh yes, Sparitual Rhythm of Life. Yes, it's similar except RoL is a frosty metallic without glitters. Here's the pic -
Do you like it? I think my skin tone doesn't go well with teal and greens... hmmm.
Wednesday, December 21, 2011
OPI I'm Not Really A Waitress + Bloop H187 = Christmas mani!
Here I am again, two posts in a week! I'm heading to Sabah for holidays from tomorrow onwards, with no polish to change and no treatment for my nails, I thought of putting this mani up before closing the final week of December 2011.
It's the Xmas week now, what are your festive plans? I did a Xmas manicure right after my exhausting Singapore trip. Done in a hurry with a half-hearted attitude, no surprise it's a sloppy paint job :(
These are the polish I used for Xmas manicure:
I did a brief swatch on OPI I'm Not Really A Waitress before, click here to view.
Bloop H187 is a semi-frosty, semi-metallic elf-green polish. It's the perfect Christmas green but my camera sucked out the green and produced a teal. Hmm. The true color can be seen on my nails in the swatch photos below.
OPI Sparkle-icious is part of OPI Holidays 2010 Burlesque collection. It's a clear base filled with purple, gold and blue micro hexagonal glitter. It screams festive yea?
Here's the swatch; would you believe it's done by a leftie cat? :p
I used french tip guide for the color block. Apparently my lousy tip guide is not arched enough to create the curves on all nails. Not only that, I removed the tips while polish was still wet. As a result the polish dragged with the tape and made the lines uneven. Aarrrggh!!
In reality they don't look that bad but I should have done a chevron manicure instead. Oh well, always a lesson learnt for future improvements!
A closer look at OPI Sparkle-icious. To be honest, I'm creeped out by the tons of dots piled up on my nails. It's appears glittery and dazzling on the naked eye but my skin crawls by its macro shot...
P/S: I used Elianto White as my base before putting 3 coats of Sparkle-icious
Since I won't be around till end December, Nailbytes hereby wishes you:

Take care guys!
It's the Xmas week now, what are your festive plans? I did a Xmas manicure right after my exhausting Singapore trip. Done in a hurry with a half-hearted attitude, no surprise it's a sloppy paint job :(
These are the polish I used for Xmas manicure:
I did a brief swatch on OPI I'm Not Really A Waitress before, click here to view.
Bloop H187 is a semi-frosty, semi-metallic elf-green polish. It's the perfect Christmas green but my camera sucked out the green and produced a teal. Hmm. The true color can be seen on my nails in the swatch photos below.
OPI Sparkle-icious is part of OPI Holidays 2010 Burlesque collection. It's a clear base filled with purple, gold and blue micro hexagonal glitter. It screams festive yea?
Here's the swatch; would you believe it's done by a leftie cat? :p
I used french tip guide for the color block. Apparently my lousy tip guide is not arched enough to create the curves on all nails. Not only that, I removed the tips while polish was still wet. As a result the polish dragged with the tape and made the lines uneven. Aarrrggh!!
In reality they don't look that bad but I should have done a chevron manicure instead. Oh well, always a lesson learnt for future improvements!
A closer look at OPI Sparkle-icious. To be honest, I'm creeped out by the tons of dots piled up on my nails. It's appears glittery and dazzling on the naked eye but my skin crawls by its macro shot...
P/S: I used Elianto White as my base before putting 3 coats of Sparkle-icious
Since I won't be around till end December, Nailbytes hereby wishes you:

Take care guys!
Friday, November 18, 2011
China Glaze Westside Warrior + Trendsetter and Konad!
TGIF!
I haven't been posting much, I know. My card reader isn't working right which caused significant delay in transferring photos from camera to hard disk.
Today I'm showing a konad mani! YES I HAVE KONAD SET. FINALLY!
I bought Konad Special Set at a discounted price, thanks to Groupon. I actually received it in late October and my first attempt was pathetic. I did it with Nubar Baby Blue for my bestie's wedding ceremony and if you recall, I was ashamed to post it here since there were awful bubbles and bad stamping work on my nails. I had serious issues with Konad polish, they are very gooey and dried too fast. I couldn't transfer the image to my nails properly and everything went downhill from there. I almost gave up but I remembered other bloggers had recommended China Glaze polish for stamping. Hey, they're so damn right. It glided on smoothly, easily and with the added benefit of various colors to play with!
Here's the picture of my Konad Special Set!
This set includes:
For my manicure-of-the-week (MOTW), I used China Glaze Westside Warrior and Trendsetter from Metro collection Fall 2011.
China Glaze Trendsetter is a mustard-olive polish with subtle shimmers. It looks sandy indoors but dazzles under the sun. Pigmentation is superb, a medium coat will reach opacity! This may not be a congeniality shade, much like OPI Who The Shrek Are You. I, however, like how unusual it looks on the nails. As I said, hidden gems are the most treasured.
China Glaze Westside Warrior is in military green shade. The color from the bottle appears a level lighter than how it looks on the nails. I took the photos after a heavy rain and lighting failed to reflect the actual color. What you see is a tad darker than in reality. Think of it as the color in army fatigues.
It's a little tacky on the application because it drags and result in patches. But it builds up beautifully; I applied two coats for complete coverage.
Are you ready to see my 2nd feeble attempt in stamping? It wasn't perfect but at least they transferred to my nails.
I chose the zebra stripes in M57 plate.

Taken without top coat and before clean-up:
After a layer of Elianto top coat and Seche Vite top coat:
After the storm, sun came back with vengeance. It was too sunny so I took a shot of my left hand indoors. I'm a leftie so my painting skill is left to be desired:
If you notice, the lines on my right are different from my left's. For my right hand, I placed my fingers on the table and stamped the image but for my left's I lifted them to my eye level. I would say image looks better by using the second method!
And I gotta say I'm very pleased on the color combination. It's not in stark contrast but both complemented each other well. With Trendsetter's shimmers, it bounces on and off against the light!
I only tried China Glaze For Audrey once for marbling so I didn't know how good their polish are. After this round I'm impressed. The brush is easy to work with, pigmentation is great and they are sooooooooooo glossy and shiny. China Glaze is renowned for very good reasons. Thank you CG.
If you would like to purchase Konad products, click on the links:
Konad Malaysia
Konad Singapore
Konad Facebook (malaysia)
With this mani I renewed my interest and confidence in stamping. I intend to do it few more times, even with Konad polish and plan to get more image plates in the future. Meanwhile I'm striking out Konad in my Wish List :)
Have a good weekend!
I haven't been posting much, I know. My card reader isn't working right which caused significant delay in transferring photos from camera to hard disk.
Today I'm showing a konad mani! YES I HAVE KONAD SET. FINALLY!
I bought Konad Special Set at a discounted price, thanks to Groupon. I actually received it in late October and my first attempt was pathetic. I did it with Nubar Baby Blue for my bestie's wedding ceremony and if you recall, I was ashamed to post it here since there were awful bubbles and bad stamping work on my nails. I had serious issues with Konad polish, they are very gooey and dried too fast. I couldn't transfer the image to my nails properly and everything went downhill from there. I almost gave up but I remembered other bloggers had recommended China Glaze polish for stamping. Hey, they're so damn right. It glided on smoothly, easily and with the added benefit of various colors to play with!
Here's the picture of my Konad Special Set!
This set includes:
- Instruction CD
- Step-by-step guide in paper
- Product catalog
- 5 Konad special polish (red, white, green, pink pearl, black pearl)
- 1 Top coat
- 5 Image plates (M3,M36,M44,M55,M57)
- 30 Rhinestones
- 1 Image plate holder
- 1 Stamp and 1 Scraper
For my manicure-of-the-week (MOTW), I used China Glaze Westside Warrior and Trendsetter from Metro collection Fall 2011.
China Glaze Trendsetter is a mustard-olive polish with subtle shimmers. It looks sandy indoors but dazzles under the sun. Pigmentation is superb, a medium coat will reach opacity! This may not be a congeniality shade, much like OPI Who The Shrek Are You. I, however, like how unusual it looks on the nails. As I said, hidden gems are the most treasured.
China Glaze Westside Warrior is in military green shade. The color from the bottle appears a level lighter than how it looks on the nails. I took the photos after a heavy rain and lighting failed to reflect the actual color. What you see is a tad darker than in reality. Think of it as the color in army fatigues.
It's a little tacky on the application because it drags and result in patches. But it builds up beautifully; I applied two coats for complete coverage.
Are you ready to see my 2nd feeble attempt in stamping? It wasn't perfect but at least they transferred to my nails.
I chose the zebra stripes in M57 plate.

Taken without top coat and before clean-up:
After a layer of Elianto top coat and Seche Vite top coat:
After the storm, sun came back with vengeance. It was too sunny so I took a shot of my left hand indoors. I'm a leftie so my painting skill is left to be desired:
If you notice, the lines on my right are different from my left's. For my right hand, I placed my fingers on the table and stamped the image but for my left's I lifted them to my eye level. I would say image looks better by using the second method!
And I gotta say I'm very pleased on the color combination. It's not in stark contrast but both complemented each other well. With Trendsetter's shimmers, it bounces on and off against the light!
I only tried China Glaze For Audrey once for marbling so I didn't know how good their polish are. After this round I'm impressed. The brush is easy to work with, pigmentation is great and they are sooooooooooo glossy and shiny. China Glaze is renowned for very good reasons. Thank you CG.
If you would like to purchase Konad products, click on the links:
Konad Malaysia
Konad Singapore
Konad Facebook (malaysia)
With this mani I renewed my interest and confidence in stamping. I intend to do it few more times, even with Konad polish and plan to get more image plates in the future. Meanwhile I'm striking out Konad in my Wish List :)
Have a good weekend!
Subscribe to:
Posts (Atom)